Taking a screenshot on a Chromebook can be a handy skill, whether you’re capturing notes for a class, saving an important document, or just sharing something funny with friends. In this guide, we’ll cover everything from basic to advanced methods for taking screenshots on your Chromebook, ensuring you’re well-equipped to capture anything on your screen in 2023.

Understanding Your Chromebook
Getting Familiar with Your Chromebook’s Keyboard and Interface
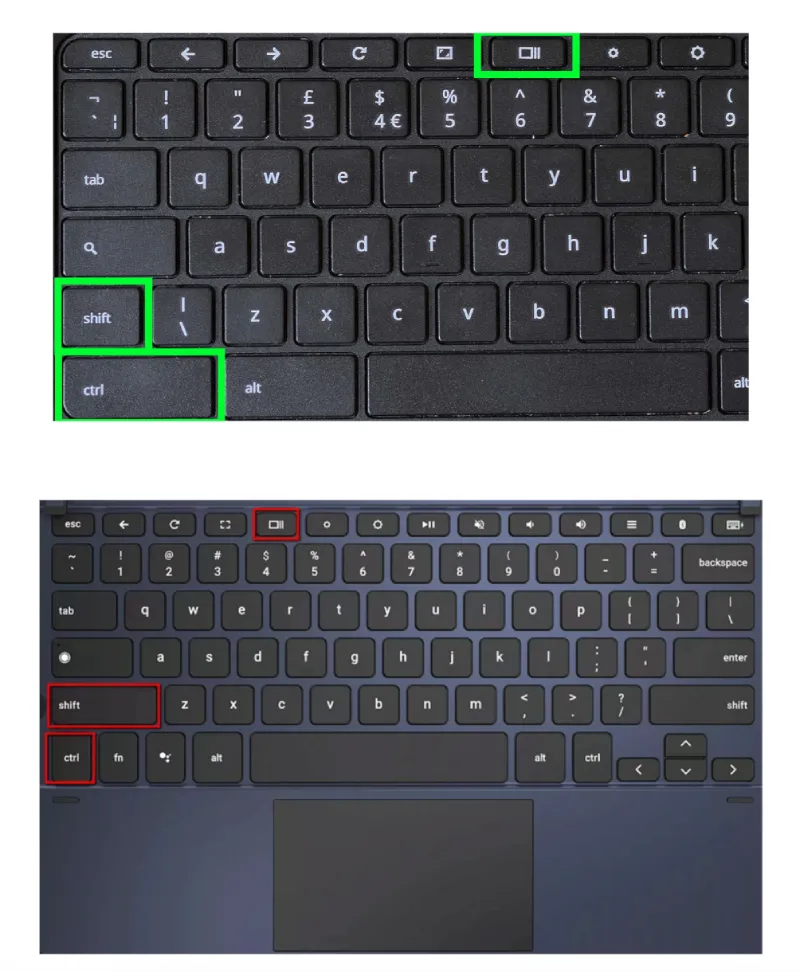
Before we delve into the screenshot methods, it’s essential to familiarize yourself with your Chromebook’s keyboard. Most Chromebooks come with a unique set of keys, including a dedicated ‘Screenshot’ key or a combination of keys for this purpose.
Image: Labelled Image of Chromebook Keyboard
Basic Screenshot Methods
Quick and Easy: Standard Screenshot Methods on Chromebook
Full-Screen Screenshot: To capture the entire screen, press Ctrl + Show Windows keys simultaneously. The ‘Show Windows’ key often features a rectangle with two trailing lines and is located in the function row, typically replacing the F5 key.

Partial Screenshot: If you need to capture a specific area of the screen, press Ctrl + Shift + Show Windows. Your cursor will turn into a crosshair. Click and drag to select the area you want to capture.

Advanced Screenshot Techniques
For those requiring more from their screenshots, consider using Chromebook’s built-in screen recorder or third-party extensions like Lightshot or Nimbus Screenshot. These tools offer additional features like screen recording and advanced editing options.

Editing and Sharing Screenshots
Once you’ve taken your screenshot, you can find it in the ‘Downloads’ folder. Chromebooks provide basic editing tools, but for more advanced features, you can use apps like Pixlr or Canva. Sharing is simple – upload your screenshot to Google Drive or directly share it via email or social media.
Troubleshooting Common Issues
Encountering issues? Here’s a quick troubleshooting guide:
- Screenshot Not Working: Check if your keyboard shortcut is correct. Ensure your Chromebook is updated.
- Can’t Find Your Screenshot: Look in the ‘Downloads’ folder, or use the ‘Search’ feature.
- Editing Problems: Ensure the editing app is compatible with your Chromebook.
Conclusion
With these tips and tricks, you’re now equipped to take, edit, and share screenshots on your Chromebook with ease. Experiment with the different methods and tools to find what works best for you. Happy screenshotting!


