Taking screenshots on Mac is a common task that allows us to capture and save images of what’s displayed on our computer screens. On Mac Sonoma, Apples latest Operating System there are various methods available to take screenshots conveniently. These methods include using the built-in Screenshot app, keyboard shortcuts, and third-party software. Each method offers its own set of features and options, providing flexibility and convenience for capturing screenshots in different scenarios.
In this article, we will explore the different methods of taking screenshots on Mac Ventura and how to use them effectively.
Different Methods of Taking Screenshots on Mac Sonoma
Whole Screen Capture:

The simplest way to take a screenshot of your entire screen on Mac Sonoma is by pressing Shift + Command + 3. This method captures everything visible on your screen and saves it as an image file.
Note: By default your taken screenshot will save on desktop.
Selected Area Capture:

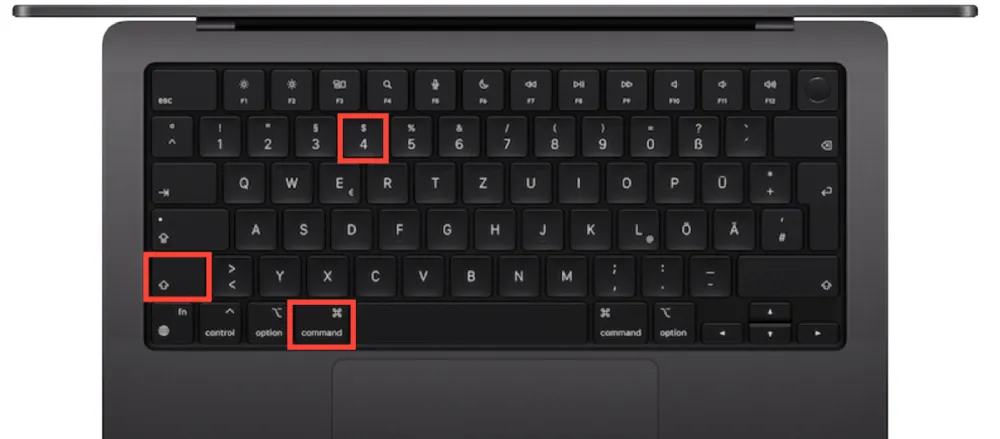
If you need to capture a specific area of your screen, press Shift + Command + 4. Your cursor will turn into a crosshair, allowing you to click and drag to select the desired area.
Window Capture:

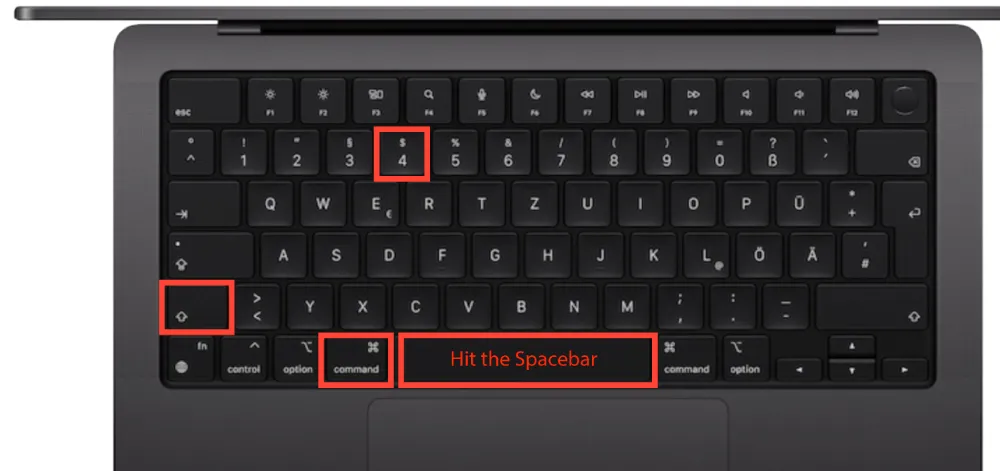
To capture a specific window, press Shift + Command + 4, then hit the Spacebar. The cursor changes to a camera icon, and you can click on any window to capture it.
Touch Bar Capture (for MacBook Pro users):
MacBook Pro users can take a screenshot of their Touch Bar by pressing Shift + Command + 6.
Using Screenshot Utility:
Mac Sonoma includes a Screenshot utility, which can be accessed by pressing Shift + Command + 5. This tool provides options for different types of screen captures, including video recording of your screen.
Timed Screenshots:
For timed screenshots, use the Screenshot utility and choose the delay option, giving you either 5 or 10 seconds before the screenshot is taken.
Third-Party Applications:
There are numerous free and paid third-party applications available for Mac that offer advanced screenshot capabilities, such as annotation tools, scrolling capture, and more.
Here are some popular free third-party apps for taking screenshots on a Mac:
Lightshot is a lightweight and easy-to-use screenshot tool. It allows you to quickly capture any area of your screen, edit your screenshots with basic tools, and share them online.
Skitch is a free app that offers a variety of screenshot and annotation tools. It’s particularly useful for adding notes, shapes, and sketches to your screenshots.
Monosnap is a versatile screenshot tool that lets you capture full screen, part of the screen, or a selected window. It also includes features for screen recording and file storage.
While Snagit is not entirely free, it offers a free trial period. It’s a powerful tool for both screenshots and screen recordings, with advanced editing features.
Greenshot is an open-source and lightweight tool that offers quick and easy screenshots and annotations. It’s quite popular for its simplicity and effectiveness.
Shottr is a relatively new tool that offers a range of screenshot capabilities, including scrolling capture, which is useful for capturing entire web pages.
Jing is another product from TechSmith, offering simple and intuitive screenshot and basic video capturing capabilities.
Conclusion
Taking screenshots on Mac Sonoma is a straightforward process, with multiple methods to suit different needs. Whether you’re capturing the entire screen, a selected area, a specific window, or using advanced third-party tools, Mac Sonoma offers flexibility and ease of use. Remember, the ability to capture visual information quickly is not just limited to Mac users.
For those using different operating systems, be sure to check out our guides on how to Take Screenshots in Chromebook, Screenshot on Windows, and Screenshot on Linux for comprehensive insights into screenshot capabilities across various platforms.


